Monday, December 10, 2012

Chocolate Wreath Biscuits


I borrowed a fabulous little book out of the library recent called "200 Christmas Recipes" and made this tasty little treat.  So you're not deceived, they're just individual biscuits, not one big wreath - I just arranged them like that on the plate!  If you want to go nut-free you could always decorate them with chopped-up candy canes, silver balls or sprinkles.  I actually found this mixture a bit on the soft side, so I'd add more flour next time.  I also have a great spin-off recipe for what to do with the inside rounds of the biscuits (to save re-rolling and cutting), so stay tuned for that!

Ingredients
250g plain flour
25g cocoa powder
250g butter, diced
140g icing sugar
2 egg yolks
2 teaspoons vanilla extract
125g white chocolate
1/2 cup pistachios, chopped
1/2 cup dried cranberries, chopped

Method
Put the flour, cocoa powder and butter in a bowl and rub in with fingertips until the mixture resembles fine breadcrumbs. Add the sugar, egg yolks and vanilla and mix to a smooth dough. Wrap and chill for 30 minutes.

Roll out the dough between two sheets of baking paper. Cut rounds using an 8.5 cm fluted biscuit cutter and a 3cm cutter for the centres.

Place on a lined baking tray and bake at 180 degrees Celsius for 15 minutes. Cool.

Melt the white chocolate (microwave is easiest!). Spread white chocolate over biscuits then scatter with pistachios and cranberries. Leave to set for about an hour before using.

Sunday, December 9, 2012

Salt Dough Christmas Decorations


One of the things I love about being a mum is getting to play and do fun activities with the kids. Sometimes we're so busy rushing about from activity to activity, that we don't get the quality time to do some good old-fashioned craft. And what better excuse than Christmas! Grandparents love getting hand-made gifts from the kids (well, they pretend to anyway!) and this one is so easy and fun. I saw some girlfriends do this with their kids (thanks for the inspiration girls!) and decided to give it a go. I got the recipe from www.taste.com.au - my mixture was probably a bit on the dry side as it had a few cracks, but overall, it was easy and fun and they look fab! You can also cut out Christmas shapes, paint any colour you like, decorate with glitter, and hang them on the tree. Give them a go!

Ingredients
1 1/2 cups plain flour
1/2 cup fine table salt
1 tablespoon vegetable oil
2/3 cup chilled water
Paint

Method
Preheat oven to 120°C. Line 2 baking trays with baking paper. Mix flour and salt in a bowl. Make a well in the centre. Pour in oil. Gradually add water, stirring mixture with a wooden spoon until combined. Turn dough onto a lightly floured surface. Knead to make a smooth ball.

Roll dough out between 2 sheets baking paper until 7mm thick. Use a bowl to cut out circles.  Press child's hand firmly in the middle. Place on trays. Roll remaining dough together and repeat.

Bake decorations for 2 1/2 hours or until firm and dry. Transfer to a wire rack to cool completely.

Paint and allow to dry.

Saturday, December 8, 2012

A Handmade Christmas

I love Christmas and the many opportunities it brings to make pretty things!  I just want to share with you a few handmade ideas that I've done this year.  People always love receiving handmade things and they don't always take too much time or effort to do.  I've done some decorating around the home too, to get into the spirit - and it always gives me joy to see it!

I've handmade my cards for the last few years and always love doing it.  People don't receive many home-made cards anymore, so it's something I like to put the effort into.  These supplies were from Spotlight & super easy to make!
Using the same Spotlight paper, I whipped up some bunting and some hanging decorations for the entry.  The stensils were from old Better Homes & Gardens Magazines.
A little display I set up in the entry using bits & pieces I've collected over the years.  The butterflies were made from the same Spotlight paper.
Hard to get a good photo but here's my Christmas tree!  I LOVE it and I love seeing the special decorations have fun memories attached.  The kids know which ones are their own significant ones and love to look and touch!
Hope's special decoration this year :-)
A friend made me this beautiful fabric bunting - it fits so perfectly, I love it!
My daughter's name has special significance at this time of year :-)
I prettied up our deck with some handmade baubles attacked to ribbon - easy and very effective!
My little piano display of bits and pieces.  I got the Advent Calendar this year and had so much fun filling it - and the kids are absolutely loving it!  Some of the things inside the drawers have been Christmas stickers, stamps, chocolates, beaded decorations and special messages.  It'll be fun thinking of more age-appropriate ideas in the coming years.
Some handmade gifts by the kids (with a little help from me!)  I'll be sharing the recipe for these tomorrow.
It's so special and fun to make handmade things and to step back and remember that Christmas isn't just all about spending and buying.  I'd love to hear your handmade ideas too!

Friday, December 7, 2012

Leftover Christmas Ham & Noodle Frittata


Here's our final ham recipe for the week - hopefully you've gotten lots of inspiration to cut down on food wastage this Christmas and use up those leftovers!  Ham Week has been a blast and today I'm finishing with a family favourite.  I like this one as a Sunday night dinner - great for cleaning out the fridge and pantry and a sure-fire winner with the kids.

Ingredients (serves 6 at 295 calories per serve)
76g packet chicken-flavoured 2 minute noodles
1 1/2 cups frozen peas, corn & carrot mix
200g broccoli or cauliflower
6 eggs, lightly whisked
200g leg ham, chopped
100g tasty cheese, grated
10g butter

Method
1/3 fill a medium saucepan with water and bring to the boil. Add noodles, flavour sachet, frozen veges and broccoli/cauli. Cook for 2 minutes and drain.

Place in a large bowl and add eggs and cheese, stirring to combine.

Melt butter in a 22cm non-stick, oven-proof frying pan over medium heat. Swirl pan to cover base with butter. Add egg mixture to pan and spread out evenly.

Reduce heat to low. Cook, without stirring, for 10 minutes or until base is brown and almost set.

Place pan under oven-grill and cook for 5 minutes or until browned. Stand in pan for 5 minutes. Slice and serve with salad.

Thursday, December 6, 2012

Leftover Christmas Ham & Cheese Muffins


Here's another great leftover ham recipe. I love it because the base recipe has just four ingredients, it's super easy and freezes well so you always have an afternoon snack on hand. I added chopped capsicum & dried herbs to mine - you could also add corn, grated carrot or zucchini, fresh herbs or a dollop of fruit chutney on top. My little Mr loved these so much he chose to have one for dessert instead of yoghurt!

Ingredients
2 cups self-raising flour
1 1/2 cups milk
1 cup grated cheese
125g ham, chopped

Method
Preheat the oven to 180 degrees Celsius.

Sift the flour and make a well in the middle. Pour in the milk, cheese, ham and any other ingredients.

Mix until combined.

Spoon into a muffin tin and bake for 25 minutes or until golden brown.

Wednesday, December 5, 2012

Leftover Christmas Ham & Zucchini Tart


Here's another fabulous leftover ham recipe from KR Castelmaine that my family really loved!  Before we get to it, I've got some really interesting stats on food wastage - according to Planet Ark, this Christmas, Aussies will spend $10.11 BILLION dollars on food, but 35% of it will be wasted.  That's huge!  So what a great reason to have recipes on hand to use up those leftovers.

So, this one is pretty similar to one of my family favourites, Zucchini Slice, but with a few small changes - and hubby says he actually likes this one better.  Once again, you can't beat the flavour of that baked ham, and you could easily add other veges like carrot, corn or capsicum.  It works perfectly in individual serves - a muffin pan would do the trick.  Excellent as a weeknight meal or to take along to a picnic.

Ingredients
1 small onion finely chopped
2 small zucchini, grated
200 grams KRC Premium Cooked on Bone Leg Ham, sliced and roughly chopped
2/3 cup grated cheddar cheese
4 eggs
2/3 cup sifted SR flour
1 tbsp chopped dill
1/4 cup vegetable oil
Salt and pepper to taste

Method
Pre-heat oven to 180 degrees

Place onion, zucchini, ham, cheese and flour in large bowl.
Add combined eggs, oil, dill, salt and pepper and fold with a spoon until well mixed.
Spoon mixture into a lightly greased individual 1 cup low flan trays or greased slice/quiche tin.
Bake in the pre-heated oven 30 minutes or until golden & set. 

Serve with salad and crusty roll.

Tuesday, December 4, 2012

Leftover Christmas Ham & Pineapple Pizza

It's day 2 of Ham Week on the Blog and for the rest of the week, it's all about what to do with those leftovers! Well, you can't go past a good old Ham & Pineapple Pizza. This is another recipe from KR Castlemaine. My hubby actually whipped this one up - and WOW! Soooo delicious! His secret recipe was using some home-made tomato relish and caramelised onion on the base. It was so good. There really is something extra-tasty about leg ham, especially with that beautiful home-baked flavour. Enjoy!

Ingredients
Pizza Base
2 ½ cups plain flour
7g sachet dried yeast
1 tsp sugar
1 cup warm milk
Pinch salt

Method
Place flour into a large mixing bowl. Combine the yeast warm milk and sugar into a small bowl and allow mixture to foam.

Make a well in the centre of flour, add pinch of salt and stir in the warm milk mixture. Mix to a soft tacky dough. Turn dough onto a floured surface and knead to a soft dough. Leave to rise for 30 minutes.

Divide dough into two and roll and shape dough to make two pizza bases.

Place bases onto greased and floured trays.

Ingredients
Pizza Topping 
40g tomato paste
200g KRC Premium Cooked on Bone Leg Ham, sliced & torn into pieces
½ fresh pineapple, thinly sliced, skin removed
200g mozzarella cheese, sliced
½ Spanish onion, thinly sliced

Method
Pre-heat oven to 200 degrees.

Spread prepared pizza base with pizza sauce top with KRC Premium Ham, mozzarella cheese, thinly sliced pineapple and Spanish onion. Bake in the pre-heated oven for 15 -18 mins. Serve hot.

Note: This recipe is only limited by your imagination. Place bowls of alternative toppings on the bench and have the family or guests prepare their own pizzas.

Monday, December 3, 2012

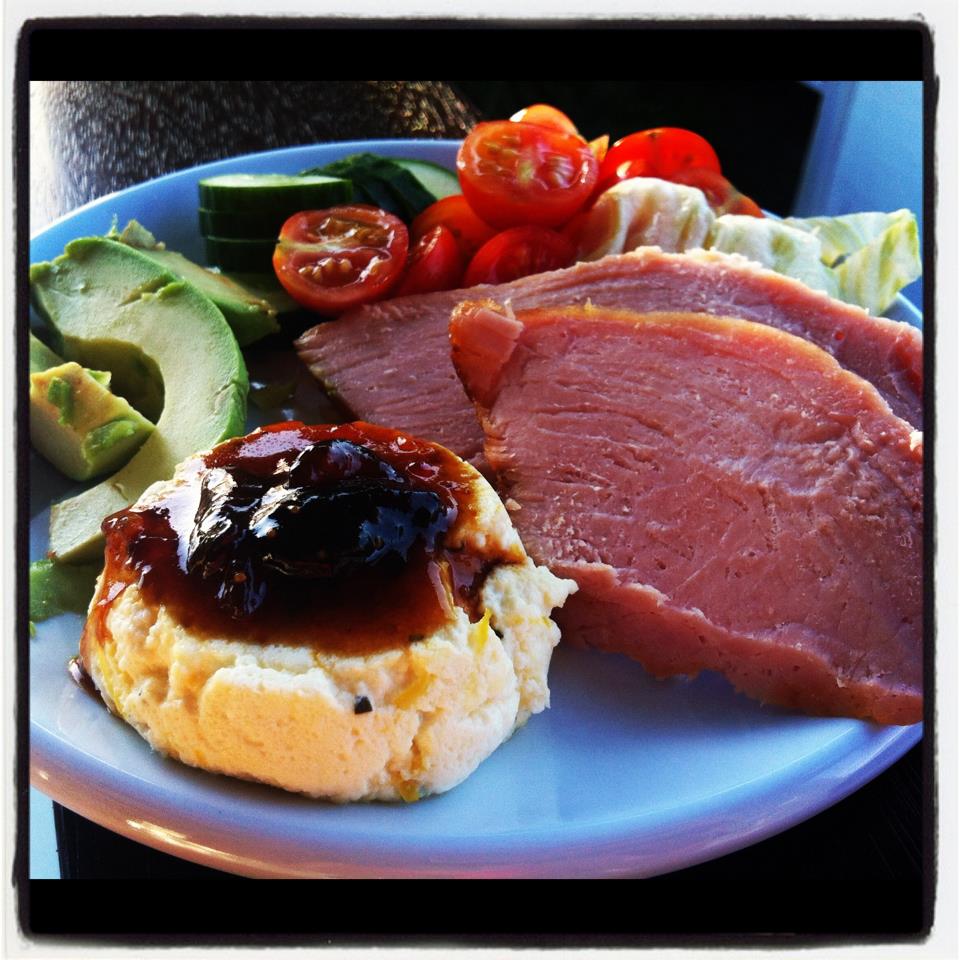
Fig-Glazed Baked Ham with Baked Ricotta and Roasted Figs


The 25 days of Christmas Recipes continues today with a very exciting theme - introducing Ham Week!  Our wonderful friends at KR Castlemaine were kind enough to offer me a Christmas Ham to use and provided me with some delicious recipes that I can't wait to share with you!  We're also giving away hams every day on 96five, so tune in for your chance to get your own ham!

So, kicking off Ham Week is the traditional Christmas baked ham.  This is my first ever attempt, so I was really excited to try it out.  The KR Castlemaine recipe uses an amazing fig glaze, which gives it this wonderful rich, sweet, sticky coating.  The flavour of leg ham is just divine, and teamed with the baked ricotta - just perfect!  I loved this recipe - the perfect feature on your Christmas table!

The prepared ham before cooking

Ingredients
KR Castlemaine Premium Cooked on Bone Leg Ham (3.5-5kg)
1 cup brown sugar 
½ cup apple juice
½ cup fig jam 
 ¼ tsp mixed spice and a pinch of ground cinnamon

Method
To make the glaze: mix sugar, juice, jam and spices together over a low heat until dissolved.

Pre-heat oven to 160-170 degrees.

Prepare KRC Premium Leg Ham: remove rind using finger tips and leave fat exposed.

Score fat in thin lines across the surface of the ham ½ cm x 5mm deep. Place KRC Premium Leg Ham in a deep foil dish or lined baking dish.

Brush with fig glaze before placing in pre-heated oven, then baste frequently during 1 ½ - 2 hours cooking time.

Baked Ricotta and Roasted Figs
8 figs – cut into quarters from top (leaving base intact)
2 tbsp olive oil
2 tbsp white balsamic vinegar
2 tbsp castor sugar
Sea salt and cracked black pepper
1kg ricotta cheese, fresh
1 tbsp finely chopped oregano
2 tbsp lemon zest
2 eggs lightly beaten

Method
Pre-heat oven to 180 degrees.

Place the figs, oil, balsamic, sugar, salt and pepper on a baking tray and toss to combine. Roast for 15 minutes, remove and allow to cool.

Place the ricotta, oregano, lemon zest, egg, salt and pepper in a bowl and mix well to combine.

Place ricotta mixture into a 24cm greased oven proof bowl or spoon into 8 x ½ cup (125ml) capacity, lightly greased dishes, place on a baking tray and bake for 15 minutes or until set. (I did it in a muffin pan - it made 9).

Allow to cool for 5 minutes before turning out.

Arrange the ricotta on a serving platter top with the baked figs.  Serve warm with fig glazed KRC Premium Leg Ham and a crispy garden salad.

The ham after baking - check out the sweet, sticky glaze!

Sunday, December 2, 2012

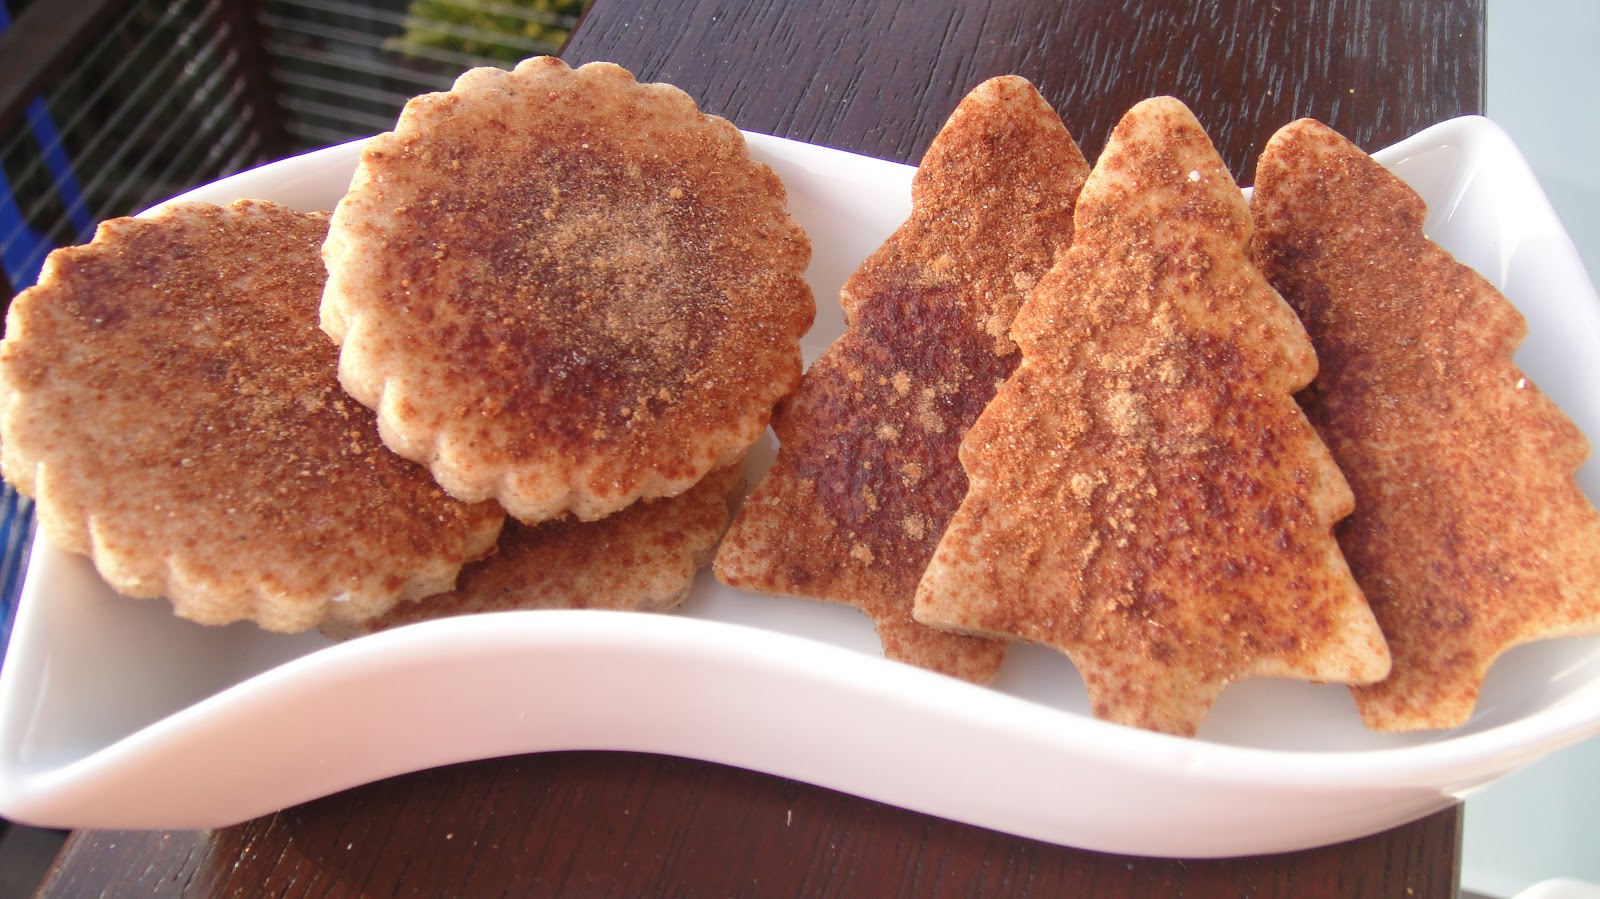
Christmas Pudding Shortbread


I found this recipe in the Better Homes & Gardens magazine, and it's a great one to keep on hand!  Chances are, you'll have most, if not all, of the ingredients on hand. They're super easy to whip up and make gorgeous little gifts if wrapped up in some cellophane.  It's a great chance to pull out those Christmas Cookie Cutters and get the kids involved too!  I didn't have any demerara sugar, so I just mixed up some caster sugar and cinnamon and sprinkled that on instead - delicious!

Ingredients
125g butter, at room temp
1/3 cup firmly packed brown sugar
1 tsp vanilla extract
1 cup plain flour
1/3 cup rice flour
1 tsp ground cinnamon
1/2 tsp ground cloves
1/2 tsp ground nutmeg
extra flour for kneading
1 eggwhite, whisked
1/3 cup demerara sugar

Method
Preheat oven to 160C. Line 2 large oven trays with baking paper. 

Put butter, brown sugar and vanilla in a bowl and beat using electric beaters until light and creamy. 

Sift flour, rice flour, cinnamon, cloves, mixed spice and nutmeg over butter mixture and stir until well combined.  Turn out onto a lightly floured surface and knead gently until mixture comes together.

Roll out dough between 2 sheets of baking paper until 4mm thick. Using a 7cm round fluted biscuit cutter, cut 15 rounds from dough, re-rolling as required. Cut rounds from dough, re-rolling as required. 

Put rounds on prepared trays, brush with eggwhite and sprinkle with demerara sugar. 

Bake for 15-20 mins or until light golden and firm. Transfer to a wire rack to cool.

Saturday, December 1, 2012

Sweet Petite Mince Pies


What a wonderful way to kick off the festive season, than with Fruit Mince Pies! In case you missed my Facebook announcement - I'll be posting a Christmas Recipe every day until the 25th! I have already been making some delicious little treats, so make sure you keep up to date with the blog for some wonderful ideas.

So, this recipe is from Sunbeam and I really love it! These are made in mini-muffin pans, and I find the size just perfect. Because there are so many yummy (and high-calorie) treats around at Christmas, I like keeping things bite-sized.

I have already frozen my batch, so have them on hand to give as gifts or to take along to any Christmas get-togethers. It could just be the Brisbane humidity, but I found the pastry quite soft, so next time I'll add an extra 1/2 cup of plain flour. I also cheated and used a bought jar of fruit mince for the filling - but hey, I've got a 1 and 2-year-old so time is precious!

Enjoy these, let me know if you whip them up and what you think!

Ingredients
FILLING
200g Sunbeam Mixed Fruit, chopped
2 tbsp golden syrup
1 tsp finely grated lemon rind
1 tsp mixed spice
1⁄4 cup brandy

PASTRY
1⁄2 cup Sunbeam Almond Meal 
2 cups plain flour
1⁄2 cup caster sugar
200g unsalted butter, chilled and diced
1 egg and 1 tbsp water, lightly beaten
Icing sugar to serve

Method
Preheat oven to 180oC.

Place all filling ingredients in a saucepan. Simmer for 5 minutes, stirring occasionally. Allow to cool.


Place almond meal, flour, sugar into a food processor and process until combined. Add butter and egg mixture and process until a ball forms. Wrap and refrigerate for 30 minutes.

Roll out pastry between two sheets of baking paper until 3mm thick. Use a round 6cm-diameter pastry cutter to cut 24 circles from the pastry. Line the base of 24-hole non-stick mini muffin pan (or use two 12-hole pans). Fill cases with fruit mince.

Re-roll pastry and use a 4cm-diameter fluted pastry cutter to cut 24 circles for the lids. Brush the underside of lid lightly with water before gently pressing onto pie. Cut a small cross in the middle of each lid.

Bake at 180oC for 15 minutes or until golden. Allow to cool and dust with icing sugar before serving. Store in an airtight container for up to 1 week.

Friday, November 30, 2012

Key Lime Pie


I have a guest blogger joining me today - my sister, Angela - also known as Jimmy.  She's a great cook and is always up for trying new things - like this Key Lime Pie (or KLP as we affectionately call it!) - she whipped up for a family dinner.  It was scrumptious!  Anyway, here she is...

"A fresh, easy and super tasty dessert.  I first came across Key Lime Pie in season 3 of 'Dexter' - when Dexter visits an old family friend in hospital, and her final wish is for the perfect piece of Key Lime Pie - a very American dessert!

After some recipe searching on Taste.com.au I found this recipe. The few times I've baked it, it's been a big hit. A great summer dessert - perfect for when the lime tree is full!"

Ingredients (serves 6)
250g ‘Nice’ biscuits
100g butter, melted
4 eggs, lightly beaten
395g can condensed milk
2/3 cup (160ml) cream
Finely grated rind and juice of 4 limes

Method
Preheat oven to 170°C. Line base of a 20cm springform tin with baking paper.

Process biscuits until fine crumbs. Add butter, process until combined. Press mixture firmly into the base and 3cm up sides of tin. Refrigerate.

Whisk eggs, milk, cream, lime rind and juice until smooth. Pour into biscuit crust.

Place on tray and bake for 40-45 mins or until set. Cool. Serve with extra lime slices and whipped cream.


Thursday, November 29, 2012

Gluten-Free Muesli Slice


I was searching for a gluten-free slice to take along to a group and found this one in the "Generous Helping" cook book.  As I was making it, I started to wonder if oats really are gluten free.  I found this interesting explanation online, which was a perfect answer to the question.  So, for the 1 in 5 people who are gluten free but CAN'T eat oats, I'm sorry - this recipe is not for you!  But for everyone else, it's fabulous!  I've included the nuts in this recipe, but I didn't add them, just so I could keep it gluten, nut and egg-free.  I hope you enjoy this one!  You can hear Liam & Robbie's review at the bottom of this post!

Ingredients
400g tin condensed milk
2 1/2 cups rolled oats
3/4 cup raw peanuts
1 cup mixed seeds (eg pumpkin, sesame, sunflowers)
3/4 dried fruit (eg sultanas, apricots, raisins, cranberries)
3/4 cup desiccated coconut

Method
Preheat oven to 150 degrees celsius.  Line a 20cm square tin with baking paper.

Place the condensed milk in a glass bowl and warm in the microwave (about 30 seconds).  Add remaining ingredients and mix well.

Press mixture into the tin and bake for 1 hour or until golden brown.

Wednesday, November 28, 2012

Creamy Salmon Pasta


This is another one of those genius mummy moments I had - despite this meal being one threw together using some leftover salmon & cream cheese. You (and the kids) won't believe this delicious, creamy meal is so low in calories! It comes in at just 165 calories per serve - so hard to believe! That's using the slim pasta, but it's still low-cal if you use any old pasta. Fab for the whole family!  Plus hear Liam & Robbie's review below :-)

Ingredients
1/2 large cauliflower, chopped
125g low-fat cream cheese
Olive oil spray
1 red onion, chopped
1clove garlic, crushed
1 tablespoon whole grain mustard
100g smoked salmon
500g slim pasta (I used fettuccini) or 200g any standard pasta
1/2 broccoli, chopped

Method
Steam cauliflower then purée with a hand-held blender or food processor. Add cream cheese & combine.

Steam broccoli. Cook pasta if necessary.

Heat a frying pan over medium heat and spray with oil. Add onion & garlic and sauté until soft & brown. Add mustard and cook 1 minute.

Add smoked salmon & cauliflower mixture and stir. Add broccoli & pasta and stir to combine. Serve.

Monday, November 26, 2012

Honey Soy Chicken Skewers


You can always buy marinated chicken skewers from the shops - but it really is quick, easy and cheap to make your own! You generally pay at least $1 per skewer, but these come in at about 50 cents, so it's definitely good value! And it's only 55 calories per skewer. Kids seem to love food on sticks, so give it a go!

Ingredients (serves 4)
400g chicken breast, diced
2 tablespoons soy sauce
2 teaspoons honey
1 tablespoon ginger, grated
Spray olive oil
Salad (I used cucumber, corn & capsicum)

Method
Combine soy sauce, honey & ginger in a bowl. Add diced chicken. Cover and marinade for a couple of hours or overnight.

Thread onto 8 bamboo skewers (soak skewers in water before use, so they don't burn). Cook on a barbecue or grill pan until brown & cooked through. Serve with salad.

Friday, November 23, 2012

Pizza Dough


I love a good home-made pizza and had been going for the convenience of store-bought bases.  But sometimes I just feel like getting my hands into some dough - for some reason, I find it really satisfying to make things with proper yeast!  So I got this recipe from my new favourite Facebook page - Bread & Butter Mum.  It makes enough for 2 bases, so I put half in the freezer and we used it a week later.  It's a great recipe and I know you'll love it too!  The finished product below is caramelised onion, roast sweet potato & cheese - it was DIVINE!!!

Makes 2 x 32cm diameter pizzas.

Ingredients:
2 1/4 cups plain flour
3 tsp dry yeast
1 tsp sugar
3/4 cup warm water
3 tblsp olive oil

Method
Sprinkle yeast and sugar over water, cover and stand in a warm place for 15mins until frothy.

Mix flour and a pinch of salt and pepper in a bowl.

Add olive oil to yeast/water mix and add all this to the flour mix. It should be a moist dough so add a little extra water if needed. Cover and stand in a warm place for 30mins or doubled in bulk.

Heat oven to 250* Celcius with a pizza stone or oven tray in it so it gets nice and hot.

Divide dough in a half and using a generous amount of flour roll out into your pizza base. Put on top of stone or tray and cover with pizza sauce cheese etc whatever you like. Bake for 15mins or until golden brown.


Monday, November 19, 2012

Chocolate Chickpea Cake


Well, today is my 27th Birthday - yay!!!  I love birthdays and love the opportunity to do fun things and spend time with special people!  The hubby, kids & I are heading off on a little mini-break today, so we celebrated with family last night.  I left the menu completely up to mum, and she excelled herself as usual!  For main course, she made this, as she knows Mexican is my current favourite.

And for dessert, she brought out a delicious chocolate cake.  It wasn't until after we'd eaten, that she revealed exactly what it was.  We were all shocked and amazed!  I would have NEVER guessed that it had chickpeas in it and I couldn't even taste the orange juice!  Mum used dextrose instead of the sugar listed below - it really wasn't sweet, but just had that deep, beautiful flavour of a cocoa-rich dark chocolate.  The nuts are optional (we had walnuts) and you could also use dark chocolate chips instead of the cocoa.  The cherry sauce (listed below) just gives it that extra texture and flavour - a real winner!

This one is worth a try - you'll be amazed!

Ingredients
400g can chickpeas, rinsed and drained
2/3 cup orange juice
4 eggs
2/3 cup sugar
2/3 cup cocoa
1/2 teaspoon baking powder
1/4 teaspoon baking soda
1 teaspoon vanilla
1 cup hazelnuts or walnuts, roasted and crushed

Method
Preheat oven to 180 degrees celsius/160 fan-forced.  Blend chickpeas and orange juice in a food processor.  Add eggs, one at a time.  Add all other ingredients and combine.  Bake in a round 8 or 9-inch tin for 45 minutes.  Let cool in tin.

Cherry Sauce
2 cups frozen cherries
1 teaspoon sugar
1/8 teaspoon cornstarch

Combine ingredients in a small saucepan over low heat.  Simmer for 15 minutes.  Spread over cake and serve.

Nana's special helper!

Wednesday, November 14, 2012

Hedgehog Slice


I had a spare packet of Scotch Finger biscuits in the cupboard, so decided to make this quick and easy, no-bake slice.  I omitted the nuts and the egg and it came out perfectly!  The only advice I'd give is to let it chill before spreading the icing over - mine was still a bit crumbly when I was trying to ice it.  All in all, a quick, easy and yummy slice - thanks to www.kidspot.com.au for the recipe!

Ingredients
250g packet Scotch Finger biscuits
¾ cup chopped pecans (or walnuts or almonds)
1 cup sultanas
125g butter
125g caster sugar
2 tbsp cocoa
2 tbsp coconut
1 tsp vanilla
1 egg, lightly beaten

Icing
1½ cups icing sugar
2 tbsp cocoa
2-3 tbsp water

Method
Grease a slice tin with butter.

Crush biscuits either by hand or in a food processor, leaving some lumps (I just broke them into a bowl then crushed with the base of a drinking glass).

Add nuts, sultanas, cocoa and coconut.

In a small saucepan or the microwave, melt butter, then stir in sugar, and vanilla.

Stir through biscuit mixture and then stir in egg.

Press into tin with the back of a spoon.

Put a bit of cold water on your fingers to press down the top so it is smooth.

To make icing, combine icing sugar and cocoa in a bowl and stir in enough water to form a spreadable paste.

Spread icing over slice and refrigerate overnight (this makes slicing much easier).

Cut into squares.

Monday, November 12, 2012

Zucchini & Haloumi Fritters


This recipe is from a Coles magazine - I loooove haloumi, so I thought these were delicious!  Just under 300 calories per serve (including salad), so they're a real winner :-)

Ingredients (serves 4)
1/2 cup self raising flour
1/2 cup buttermilk
1 egg, lightly beaten
1 tablespoon chopped parsley
1 carrot, grated
1 zucchini, grated
1/2 cup corn kernels
200g Haloumi, grated
Olive oil spray
1/4 iceberg lettuce, shredded
1/2 cucumber, chopped

Method
Place flour, milk, egg and parsley in a bowl. Stir to combine. Add vegetables and Haloumi and mix well.

Heat a spray of oil in a frying pan over medium heat. Spoon heaped tablespoons of mixture into the pan and cook fritters for 2-3 minutes each side, until golden and cooked through. Drain on a paper towel.

Combine lettuce and cucumber. Drizzle over salad dressing if you wish. Serve with fritters.

Saturday, November 10, 2012

Good Food & Wine Show

Today I was fortunate enough to get complimentary tickets to the Good Food & Wine Show in Brisbane.  What a fantastic day out!  I went along with my sister Angela, as well as my big girl, Hope.  We had a blast, sampled a huge variety of foods, sipped on some wines and generally had a lot of fun!  The show's still running for another day, so if you have the chance, definitely get down and check it out!  Here's our day in pictures...

First up, the Celebrity Theatre, where we saw Manu Fieldel in action.  His food looked and smelled amazing and he was a lot of fun! Loved the bean bags at the front for the kids! 

Hope's main request was for yoghurt - so we sampled every yoghurt there!  Delicious, creamy & smooth - she gave it the big thumbs up!  Hope also loved the cheese section (bottom right), where we tasted amazing feta, ricotta and haloumi.

Enjoying an amazing Butter Chicken (top), a glass of wine (bottom left) and my lovely friend Belle working at the Chilli Chocolate stand (bottom right).

At the "Skinny Girl" stand!

Some of the wares on offer 
Goodies I came home with - heaps of freebies and some great show specials !


Friday, November 9, 2012

Chicken Stir-fry with Egg Noodles


This recipe is a fantastic one from Curtis Stone.  It's a Coles "Feed your family for $10" one - so straight up, we know it's cheap and family-friendly.  It's low-calorie too - just 298 calories per serve and DELICIOUS! The original recipe uses prawns, but I substituted chicken and it worked really well - you'll love this one!

Ingredients (serves 4)
Olive oil spray
1/2 medium brown onion
2 tablespoons fresh ginger, finely chopped
1/2 red chilli, thinly sliced
1/4 cup rice wine vinegar
1 1/4 cups pineapple juice
1/4 cup tomato sauce
2 tablespoons soy sauce
4 teaspoons brown sugar
200g egg or Singapore noodles
400g chicken breast, cut into strips
1 carrot, peeled and thinly sliced
1 red capsicum, thinly sliced
200g Chinese cabbage

Method
Heat oil in a medium saucepan over medium heat and cook onion for 3 minutes, until softened. Add the ginger and chilli and cook for a further 2 minutes.

Add vinegar, pineapple juice, sauces and sugar and bring to the boil. Reduce heat and simmer for 10 minutes or until sauce reduces to 1 cup. Remove from heat.

While sauce is reducing, cook noodles according to packet directions.

Place a wok over high heat and spray with oil. Add chicken and cook until browned lightly. Add carrot and capsicum and cook for another 2 minutes. Add wombok and cook for 1 minute, until wilted.

Add the sauce and noodles and toss well. Serve.


Print