Friday, June 28, 2013

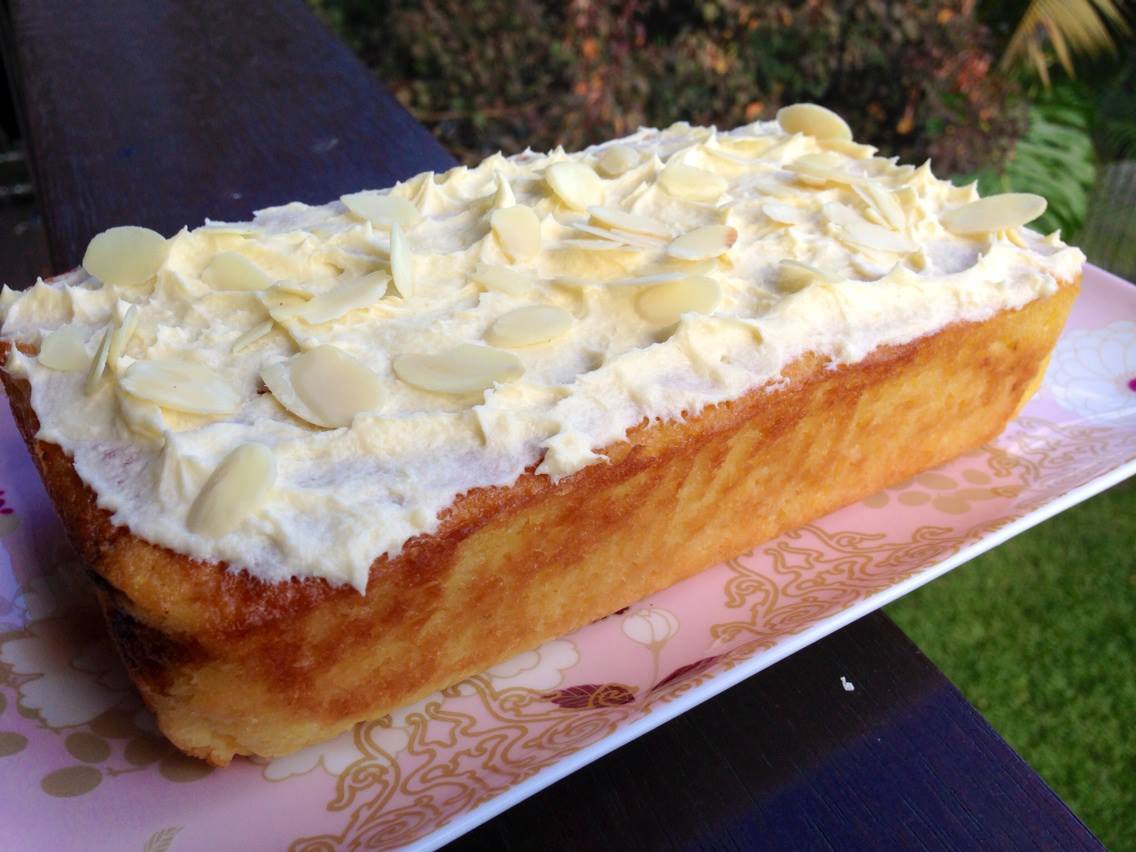
Lemon Ricotta Cake


This recipe is from www.taste.com.au and it's SO super easy because it's basically all done in the food processor!  The ricotta and almond meal give it a delicious texture, while the zing of the lemons is delicious!  I drizzled it with an icing just made of icing sugar and lemon juice - delicious!


Ingredients
250g fresh ricotta
2 eggs, at room temperature
160g (2/3 cup) caster sugar
90g butter, melted
3 lemons, rind finely grated, juiced
225g (1 1/2 cups) self-raising flour, sifted
60g almond meal

Method
Preheat oven to 180°C. Prepare a 22cm round cake tin or kugelhopf.

Place the ricotta, eggs and sugar in the bowl of a food processor. Process until well combined and the ricotta is smooth. Add the butter, lemon rind and lemon juice, and process to combine.

Transfer the mixture to a large bowl. Add the self-raising flour and almond meal, and use a spatula to fold in until combined. Spoon the cake mixture into the prepared pan and bake in preheated oven for 35-40 minutes or until a skewer inserted in the centre comes out clean. 

Set aside for 5 minutes, then remove the side of the pan and turn onto a wire rack to cool completely.

Wednesday, June 26, 2013

Potato & Leek Soup


Here's a warming winter soup that's simple but so delicious!

Ingredients (serves 4)
olive oil spray
1 large leek, white part only, sliced
1 brown onion, chopped
1 clove garlic, crushed
500g potatoes, peeled and chopped
2 cups vegetable stock
1 cup water
1 cup low-fat milk
1 large kranski sausage, cooked
herbs, to garnish

Method
Heat a large saucepan over medium heat.  Spray with olive oil.  Cook leek, onion and garlic until soft and translucent.

Add potatoes, stock and water.  Bring to the boil, then reduce heat and simmer for 20 minutes, until potatoes are soft.

Stir through milk.  Blend with a hand-held blender until smooth.

Stir through chopped sausage and garnish with herbs.  Serve.


Thursday, June 20, 2013

Whole Wheat Waffles


I've posted before about my fondness for waffles every once in a while.  I usually do a basic sweet mix, or these tasty savoury ones.  I came across this recipe from the 100 Days of Real Food Blog - they are refined sugar-free, can be dairy-free if you use something like almond milk, and taste amazing!  It's great to have a breakfast treat that you don't have to feel guilty about.  Enjoy!


Ingredients
2 large eggs
1 1/2 cups milk
¼ cup oil (I used coconut oil)
1 tablespoon honey
½ teaspoon ground cinnamon
¼ teaspoon baking soda
1 ½ cups whole-wheat flour
2 teaspoons baking powder
⅛ teaspoon salt
Warmed 100% pure maple syrup for serving
Fresh fruit for serving

Instructions
Preheat your waffle iron.
In a large mixing bowl whisk together the eggs, milk, oil, honey, cinnamon, and baking soda until well combined.

Add in the flour, baking powder, and salt and whisk together just until the large lumps disappear.

When the waffle iron is hot, dab it with a little butter and then ladle some batter onto the center of the iron. Follow the instructions that came with your waffle maker to know how long it should be cooked (mine takes about 3 – 4 minutes each).

Keep waffles warm until you finish cooking all of them. Top with pure maple syrup and fruit.

Monday, June 17, 2013

Pineapple & Passionfruit Jam


In my resolve to make all of my jams & preserves this year, and not buy any from the shops, things have been going well.  Until a couple of weeks ago, when I realised I had nearly finished my jar of Strawberry, Lime & Vanilla Jam - and I had given away the rest that had been in the pantry!

So I've been on the lookout at shops and markets for some cheap, suitable fruit to make a new batch.  But unfortunately, apricots and strawberries (my two favourite varieties), are not in season and are too expensive to use for jam.

Until I came across some cheap pineapples (on special at Charlie's Fruit Market this week!) - and decided that would do the trick!


This jam is different - it has a real fresh & tropical flavour - but I really like it!  And best of all, it worked out at about $4 for 4 jars full - bargain!

(Note: I used a food processor to get the pineapple very well chopped, but you could just do it by hand to have a chunkier jam).

Ingredients
2 pineapples, skin & core removed, chopped
350g caster sugar
Pulp of 3 passionfruit
Juice of 1 lemon
Ingredients
Place pineapple in a large saucepan with sugar, passionfruit & lemon on medium-high heat.

Heat, stirring, until sugar has dissolved.  Bring to a boil, then reduce heat and simmer for about 1 hour, until it's thickened and is quite golden in colour.

Cooking time will depend on your saucepan and stovetop, so keep and eye on it and cook to your liking.

Pour into hot, sterilised jars.

Wednesday, June 12, 2013

Honey Mustard Chicken


This is one of our family favourites - easy, healthy, delicious, quick & cheap!  Add it to your repertoire!

Thanks to Charlie's for the always fresh & delicious fruit & veg!


Ingredients (serves 6)
olive oil spray
1 large onion, chopped
2 cloves garlic, crushed
2 teaspoons grated fresh ginger
600g chicken breast, diced
1 tablespoon wholegrain mustard
1 tablespoon Dijon mustard
2 tbsp honey
1 1/2 cups chicken stock
400g sweet potato, peeled and diced
2 large carrots, peeled and diced
250g green beans, chopped

Method
Spray a large saucepan or wok with oil over medium heat.  Add onion, garlic and ginger, and cook for about 5 minutes, until softened.

Add chicken and cook until lightly browned.

Add the honey and mustards, and stir well, cooking for about a minute.  Add stock, along with sweet potato and carrot.  Bring to the boil, then reduce heat and simmer for about 15 minutes.

Add beans and cook for a further 5 minutes, until sauce has thickened and sweet potato is tender.

Serve as is or with brown rice or cous cous.

Monday, June 10, 2013

Apple & Custard Dessert Lasagne


After making a vegetable lasagne last week, my workmates started a discussion about what actually constitutes a lasagne - does it HAVE to contain meat?!  It was most likely an off-hand remark, but one of them set me a challenge to create a sweet, dessert lasagne.  Well, I love a challenge...and this is what I ended up with!  It's actually really delicious and turned out better than I expected!  I probably still prefer the traditional apple crumble & custard, but it's a pretty good alternative.

Ingredients (serves 8)
8 apples, peeled and chopped
1 teaspoon cinnamon
1 teaspoon vanilla essence
1/2 cup dates, chopped
1/4 cup seed mix (I used sunflower seeds and pepitas)
600mL custard (I made mine from custard powder, but you could buy a carton or make from scratch)
4 fresh lasagne sheets
50g butter, melted
1/4 cup oats
1/4 cup brown sugar
1/4 cup plain flour
1/4 cup coconut
extra dates, to sprinkle (optional)

Method
Preheat oven to 180 degrees celsius.  Grease a medium square baking dish.

Combine apples with cinnamon, vanilla and dates in a small saucepan with a splash of water.  Bring to the boil, then simmer for about 8 minutes, until soft.  Stir through the seed mix.

Make crumble by combining butter, oats, brown sugar, flour and coconut in a small bowl.

Take prepare dish and spread 1/2 of the apple mixture on the bottom.  Top with 2 lasagne sheets, trimming to fit.  Next, layer half of the custard.

Repeat with remaining fruit, then lasagne sheets, then custard.  Sprinkle crumble on top and extra dates.

Bake for about 30 minutes, until golden brown on top.

Friday, June 7, 2013

Roast Vegetable & Pesto Lasagne


This is a low-calorie version of a traditional lasagne - I love using low-fat ricotta instead of bechamel sauce, as it's so easy and delicious!  The pesto adds to the rich flavours of the roast veges (and is even nicer if you make your own!)  Enjoy!

(The veges taste best from Charlie's!)


Ingredients
1/2 small butternut pumpkin, cubed
1 medium sweet potato, cubed
1 zucchini, cubed
1 capsicum, chopped
2 medium betroots, cubed
1 red onion, chopped
olive oil spray
2 tablespoons pesto
375g tub low-fat ricotta
500g jar pasta sauce
4 fresh lasagne sheets
1/2 cup parmesan cheese, grated

Method
Preheat oven to 200 degrees celsius, fan-forced.

Place vegetables on a large roasting tray and spray with oil.  Roast for about 30 minutes, until golden and tender.  Mix through the pesto.

Reduce oven to 160 degrees fan-forced.

Take a lasagne dish and put half of the vegetables on the bottom.  Top with half of the pasta sauce, then cover with 2 lasagne sheets.  Spread with half the ricotta.

Repeat with remaining ingredients, then sprinkle with parmesan.

Bake for about 30 minutes or until top is golden.  Serve with salad.

Wednesday, June 5, 2013

Roast Vegetable & Bacon Soup


I'm so excited that it's soup weather again!  Soups are healthy, easy, cheap and so tasty - a firm favourite in our household.  This one (adapted from www.taste.com.au) is not so quick, as the veges roast for a while - but as far as preparation time goes, it's not much at all.  The flavour of the roast veges is just delicious and so is the smokiness of the bacon.  My kids loved this one and I'm sure yours will too!


Ingredients
6 bacon rashers, rind and excess fat trimmed, coarsely chopped
2 red capsicums, halved, deseeded
2 leeks, pale section only, halved lengthways, sliced
700g orange sweet potato, peeled, cut into 2cm pieces
3 unpeeled garlic cloves
olive oil spray
750ml (3 cups) chicken stock
Salt & freshly ground black pepper

Method
Preheat oven to 180°C.

Place the bacon, capsicums, leeks, sweet potato and garlic in a large roasting pan. Spray with oil.

Bake in preheated oven, stirring occasionally, for 1 hour or until the sweet potato is golden and tender. 

Transfer the capsicums to a large plate and cover with plastic wrap. Set the remaining vegetable mixture aside for 10 minutes to cool slightly.

Peel the capsicums and roughly chop.  Squeeze the flesh from the garlic cloves and add to the veges.

Place the vegetables and stock in a large saucepan and stir.  Bring to the boil over medium heat, stirring occasionally.  Use a stick blender to process until smooth.  Season with salt & pepper.

Optional: garnish with extra cooked bacon & fresh parsley.

Monday, June 3, 2013

White Chocolate Mud Cake


My father-in-law turned 80 on the weekend and I was commissioned to do the cake.  He is a farmer, so it was a bit of a John Deere theme - which really suits any age or generation!  I went with a white chocolate mud cake, with the recipe from Exclusively Food - it was divine.  I love white chocolate, so this cake is right down my alley - it was moist and dense but not too heavy - and the flavour was perfect!

The recipe below gives you white chocolate ganache, but I just used buttercream for ease of colouring and decorating.  I used fondant to do the logo on top.  It was a hit and I would definitely make this cake again (it's definitely one just for a special occasion!)

After consuming this cake, please go straight to Charlie's and get some vegetables  to counteract all this butter, sugar & chocolate!

Ingredients
300g white chocolate (I used Cadbury Dream)
200g butter
250ml (1 cup) milk
165g (3/4 cup) caster sugar
2 teaspoons (10ml) vanilla extract
2 large eggs, lightly beaten
100g (2/3 cup) self-raising flour
150g (1 cup) plain flour

Sour Cream and White Chocolate Ganache
200g white chocolate
88g sour cream

Method
Preheat oven to 160 degrees Celsius (145 degrees Celsius fan-forced).

Grease a 20cm square cake pan and line the base and sides of the pan with baking paper.

Place chocolate, butter, milk and sugar in a large saucepan over low heat, stirring frequently. Remove from heat when chocolate and butter have melted, and stir mixture until completely smooth. Allow mixture to cool at room temperature for 15 minutes.

Add vanilla and eggs to chocolate mixture and stir until well combined.

Stir flours together in a large bowl. Add one cup of chocolate mixture to the flour and stir until a smooth paste forms.

Repeat with another cup of the chocolate mixture.

Add remaining chocolate mixture and stir until mixture is smooth. This gradual method of combining the wet and dry ingredients helps prevent lumps.

Pour mixture into prepared pan.

Bake for about 1 hour 10 minutes to 1 hour 20 minutes. When the cake is ready, a fine-bladed knife inserted into the centre of the cake should come out without any batter attached.

Loosely cover cake with greaseproof paper or a clean tea towel and allow it to cool to room temperature in pan.

The cooled cake can be iced with the white chocolate ganache immediately (see directions below), or stored and then iced on the day of serving.

Store cake in an airtight container in the refrigerator and bring to room temperature before serving. The cake is suitable to freeze iced or uniced.

Sour Cream and White Chocolate Ganache
Melt white chocolate in a small saucepan over very low heat, stirring frequently. When chocolate has completely melted, remove from heat and quickly stir in sour cream. Use immediately, or if your ganache is quite runny, set it aside at room temperature to thicken slightly before using.

Wednesday, May 29, 2013

Gluten-Free Savoury Muffins


I adapted this recipe from www.taste.com.au and really enjoyed the results.  You don't have to use gluten-free flour, but if you do use standard self-raising, just lower the milk quantity a bit.  Add anything to these - carrot, corn, other herbs, or whatever you like!  They freeze well, so they're a handy little lunchbox snack.


Ingredients
1 1/2 cups gluten-free self-raising flour
2 cups grated tasty cheese
100g milk salami, chopped
1 zucchini, grated
1/4 cup fresh basil, chopped
1 cup milk
1 egg
1/4 cup fruit chutney

Method
Preheat oven to 200°C. Grease and/or line a 12-hole muffin pan or 24-hole mini muffin pan.

Sift flour into a large bowl. Add cheese, salami, zucchini and basil. Whisk milk, egg and chutney in a jug until well combined. Make a well in centre of dry ingredients. Pour in milk mixture. Using a large metal spoon, gently mix until just combined. Spoon into muffin holes.

Bake for 15 to 20 minutes or until a skewer inserted into the centre comes out clean. Stand in pan for 3 minutes. Turn onto a wire rack to cool. Store in an airtight container at room temperature.

Monday, May 27, 2013

Whole Orange Cake


This recipe is brought you by Aldi and dedicated to my dear workmates Liam & Robbie, who said to me in no uncertain terms last week, that my cooking has become too healthy and they want more butter and sugar!  This was super easy to make, it's really moist and delicious too!

You'll get the best oranges from Charlies!

Ingredients
2 medium navel oranges
200g butter (softened)
4 eggs
1 1/2 cups sugar
1 cup self raising flour
1/2 cup almond meal

Icing
50g butter (softened)
2/3 cup icing sugar
3 tsp fresh orange juice

Method
Preheat oven to 180°c (or 160°c fan forced)and grease and line a 20cm round spring
form baking tin (or two loaf tins).

Cut whole oranges (with skin and all) into bite-sized pieces and place in a small bowl or container.
Blend using a stick blender until puréed.

In a separate large bowl, beat eggs, soft butter and sugar with an electric mixer until pale and thick. Add orange purée, and beat quickly to combine.

Fold in sifted flour and almond meal, and once well combined, pour into prepared cake tin.

Bake in preheated oven for 50-55 minutes (or about 40 minutes for loaves)or until a skewer inserted into the centre comes out clean. Remove from oven and allow to cool in tin.

To make icing, beat butter with electric mixer until pale and creamy, add icing sugar and beat for 2 minutes. add fresh orange juice to the mix, and beat briefly until just combined.

Smooth icing over the top of the cake once it is completely cooled, and serve.

Friday, May 24, 2013

No-Bake Brownie Bites


Here's a recipe from one of my most favourite chefs, Dominique Rizzo.  She's a regular on 96five, and she is always so lovely and makes us AMAZING food!  These brownie bites a sugar-free, dairy-free and gluten-free - and a perfect healthy treat for the whole family!

Grab your nuts and sultanas from Charlies Fruit Online!


Ingredients (makes 20)
130g fresh dates, pitted
2 lady finger bananas or 1 ripe Cavendish banana
¼ cup cocoa nibs ( optional)
4 tblsp of raw cocoa powder ( unsweetened) or you can just use normal cocoa powder
¼ cup coconut flour
½ cup almond meal
1 cup raisins
½ cup raw macadamia nuts, chopped

Method
In a food processor combine all the ingredients except the macadamia nuts until smooth.

Fold through the nuts and press the mixture into silicone mini-muffin pans

Refrigerate for a few hours until firm and store in an airtight container in the fridge.

Thursday, May 23, 2013

Caramel, Pear & Almond Cakes


Today's post is in honour of the Cancer Council's Biggest Morning Tea!

It's happening right around the country today and for the next month or so, and is SUCH a worthwhile cause, AND celebrating it's 20th year!  Amazing!  So if you're hosting a morning tea, or just want an excuse to have a yummy treat, here's a lovely little recipe - and don't forget to send a few dollars the Cancer Council's way!

The recipe is initially from Stay At Home Mum and I just made a few adjustments :-)

Ingredients
2 cups self-raising flour
1/2 tablespoon cinnamon
1/2 cup brown sugar
1/2 cup vegetable oil
2 eggs
1 1/2 cups pears (cored, peeled and chopped)
1 teaspoon vanilla extract
1/2 cup flaked almonds

Method
In a large bowl, combine flour, cinnamon and sugar. Add oil, eggs, pears and vanilla.

Mix until just combined.

Pour into muffin pans then sprinkle almonds on top.

Bake at 165 degrees for about 20 minutes.

Wednesday, May 22, 2013

Breakfast Quinoa


As you know, I've been trying out a few new recipes with quinoa and loving it, so I was really curious to try it at another time of day - breakfast!  I adapted this recipe from Happy Healthy Mama and really loved it.  It's such a nutritious and delicious start to the day - and it can easily be intolerance-friendly by using almond milk (which also gives it a slightly different flavour) - yum!

Get all your freshness from Charlies Fruit Online!

Ingredients
1 cup quinoa, rinsed
1 1/2 cups milk or almond milk
1/2 cup freshly squeezed orange juice
zest from 1/2 an orange
1/2 teaspoon pure vanilla extract
1/2 teaspoon ground cinnamon
generous pinch nutmeg
pinch ground cloves
1 tablespoon pure maple syrup
1/4 cup dried cranberries
1/4 cup chopped cashews

Method
In a small saucepan, bring the milk, orange juice, and orange zest to a boil. Stir in the vanilla, cinnamon, nutmeg, cloves, and quinoa. Reduce heat to medium low, cover, and cook for 12 minutes.

Meanwhile, dry toast your cashews in a small skillet pan.

Remove quinoa from heat and stir in maple syrup. Sprinkle with nuts and cranberries and serve.

Monday, May 20, 2013

Chocolate Tarts (with a twist!)


This recipe is a Kim McCosker (4 Ingredients) one, which appeared in a recent Super Food Ideas magazine.  I was curious as soon as I saw it and knew it would be a perfect dessert for when my gluten-free, dairy-free sister came to stay on the weekend.  It actually exceeded my expectations - this is one DELICIOUS dessert!

It's no-bake, and so easy to make.  And it's right up there with any other cheesecake or tart I've made when it comes to taste.  The filling could easily just be serve by itself as a mousse, but the two parts together just complement perfectly.  Not to mention it has NO dairy, NO gluten, NO refined sugar, and is made up completely of real, raw, whole ingredients!  The filling is so smooth and thick and creamy...so delicious!

You could easily substitute part of the almonds and dates for other nuts or dried fruit to make up the quantities.  I just used a standard silicone muffin pan - it made about 9 tarts, and they were a perfect size (because despite the no sugar, they are quite sweet and rich!)  Give this one a go, you'll be amazed!


Ingredients
Base
250g raw unsalted almonds
200g fresh pitted dates
1/2 cup coconut

Filling
2 avocados
1 large banana
1 cup gluten-free raw cacao powder
1/2 cup pure maple syrup

Method
Place base ingredients in a food processor and blend for 5 minutes or until quite fine and mixture comes together ( you may need to scrape the mixture down).

Press into one large or several small tart tins. Chill for about 1 hour.

Make filling: scoop avocado flesh into a food processor, add the banana, cacao and maple syrup and blend until smooth.

Spread over base/s and refrigerate until set.

Wednesday, May 15, 2013

Real Food for Real Families: Week 4


Here's the next and final instalment of Real Food for Real Families.  This is a really great meal plan, as it uses a lot of ingredients in a couple of recipes, which helps keep the cost down.  For example, just buy 1 packet of rice noodes, and split them between the Rice Paper Rolls and the Asian Market Noodles.  I also omitted the baby corn from the Asian Market Noodles and used 1/2 tin corn instead.  A couple of the recipes also serve 6, so if you're serving a family of less than that, you'll have plenty of leftovers for lunch, or even for an extra dinner.

I hope you've enjoyed keeping it real for the month - it's been a great challenge for me and very eye-opening in some cases.  I also think it's really formed some good habits for me, in reading labels more and being more picky about some of the food I buy for the family.  I hope it's given you some food for thought also, and helped you to make some healthy changes along the way!

Monday: Shepherd's Pie
Tuesday: Rice Paper Rolls
Wednesday: Minestrone
Thursday: Brown Fried Rice
Friday: Asian Market Noodles
Saturday: Sausage & Cous Cous Salad
Sunday: Leftovers/throw-together meal/go out to dinner

Breakfast: Porridge (sweeten it naturally with fruit or honey) or Healthy Breakfast Crumble
Lunch: Home-made wraps with salad and egg; leftovers
Snacks: Nuts, sultanas, rice cakes, cheese, home-made yoghurt, Pizza Scrolls (use wholemeal flour), fruit, carrot & celery sticks

Shopping List:

In the pantry:

cinnamon
30g butter

tomato paste
dried and/or fresh herbs
oil
vegetable stock
soy sauce
cumin

Fresh:

pears                       $3
2 capsicum              $3

500g sweet potato   $2
bag of onions          $2
red onion                 $1
1kg carrots              $1
bag zucchini           $3
bean sprouts           $3
1 cucumber             $1
garlic                       $1
celery                      $2
1/2 cabbage             $3
lemon                      $1

Dairy/Meat:

100g mild salami     $3

400g beef mince      $3
6 sausages (try and get nice, less processed ones from the butcher) $5
1kg cheese              $6
3L milk                   $3  
1 chicken breast      $3
shaved parmesan    $3

Groceries:
oats                           $1

fruit, nut & seed mix $4
honey                        $3
coconut                     $2
rice cakes                  $1
wholemeal SR flour  $2
3 tin diced tomatoes  $3
1 packet rice noodles $4
peanuts                      $2
rice paper rounds       $3
hoisin sauce               $2
wholemeal pasta        $2
1 tin white beans       $1
1 tin corn                   $1
eggs                           $3
cous cous                   $2
1 tin chickpeas           $1
raisins                        $3
brown rice                 $2
frozen vegetables       $2

Extras:
1kg plums                     $3
1kg apples                     $3
1kg bananas                  $2
1kg grapes                     $3
mineral water                $1

Total:                          $108

Saturday, May 11, 2013

Brown Fried Rice


This recipe is a favourite of mine, now that I call myself a "runner".  It is so easy, and using frozen veges means you always have the ingredients on hand.  Brown rice is fantastic -  it keeps you fuller for much longer than white rice does, is much less processed and is perfect fuel for a long run.  Great for the kids too!

Ingredients
1 cup brown rice
olive oil spray
2 eggs, beaten
dash of milk
1 brown onion, chopped
1 clove garlic, crushed
2 cups frozen veges (I like peas, corn & carrot)
3 tablespoons soy sauce
1 tablespoon oyster sauce
salt & pepper

Method
Cook rice according to packet.

Heat a wok over medium heat.  Spray with olive oil.  Combine egg and milk and beat together.  Pour into the wok and cook as an omelette for a couple of minutes, until set.  Flip if necessary.  Remove from the pan and cut into strips.

Meantime, spray wok with more oil if needed.  Add onion and garlic and cook for a few minutes until tender.  Add vegetables and cook for another 5 minutes, stirring occasionally.  Add rice and sauces and mix well, cooking for another 5 minutes.  Season and serve.

Healthy Mother's Day: Paleo Beetroot Cake & Fruit Cupcakes


This recipe is taken from a blog called The Saffron Girl...I wanted a healthy, real food treat to make my mum & mum-in-law for Mother's Day.  I LOVE that it is gluten, dairy & refined sugar-free - and the taste is simply divine!  I added some frozen raspberries on top and that make it just amazing.  Unfortunately, I had big issues with it sticking to my silicone heart-shaped cupcake pan, so I nearly didn't blog it - but they really do taste so good! The photo doesn't really do them justice...but these are definitely worth a try (and make sure you line your pan with baking paper, or grease it really well!)

Ingredients
3 cups of grated, cooked beetroots
4 eggs
1/2 cup olive oil
1/2 cup raw honey
1 tablespoon vanilla extract
1 teaspoon baking soda
1/2 teaspoon sea salt
1/2 teaspoon ground cinnamon
1/4 teaspoon ground nutmeg
1/2 cup raw 100% cocoa powder
1/3 cup coconut flour (for a slightly fluffier and dryer cake, use 1/2 cup coconut flour)*

Process
Preheat oven to 170C (350F).

In a food processor or blender, beat the beetroots, eggs and olive oil.
Add the honey, vanilla extract, baking soda, sea salt and spices. Blend well.
Add the cocoa powder and coconut flour and mix until well incorporated.
Pour into a greased cake pan of choice. I used a 9-inch diameter tart pan.
Bake for 35-45 minutes, or until an inserted toothpick comes out clean.
Cool completely before cutting and serving. Garnish as desired.

*I’ve made this cake both ways, with more and less coconut flour. I really can’t say which I prefer, as I love both. I would suggest making it both ways and deciding for yourself too!


AND here is my contribution for family brunch tomorrow!  I was on fruit duty, but wanted something a bit fancier than just your usual platter!  Very happy with the result  - I just used cookie cutters for the watermelon and a knife for the rest.

Raw Chocolate Beetroot Cake


My sister Fiona has done a bit of experimenting with raw foods and made this delicious raw beetroot cake on a recent visit.  It was rich and sweet and amazing, and it's hard to believe it's raw!  This is not the exact recipe she used, but it is very similar - I got this one from Dawn's Raw Kitchen.  This is definitely worth a go for something different, delicious and healthy!

Base:
1 1/2 cups Cashew Nuts (unsoaked)
1 1/2 cups Unsweetened Shredded Coconut
1 1/2 cups pitted Medjool Dates
1/2 cup Cacao Powder

Place all base indredients in a food processor fitted with an S blade, process until coarsely ground, should be slightly sticky. Line the base of a 9inch drop bottom cake tin, press the ingredients in to form a flat. Set aside.

Cake Filling:
3 cups Almond Meal
1/2 cup Beetroot Juice, (from 2 Beets)
Pulp from juiced Beets (optional – give a slight earthy taste)
8 Pitted Medjool Dates
3 Tablespoons Cacao Powder
Pinch of Sea Salt

Place all ingredients in a food processor fitted with an S blade, process until smooth. Add to cake base and smooth out.

Fudge Topping:
1 cup Medjool Dates
6 Tablespoons Cacao Powder
4 Tablespoons Maple Syrup
1/2 cup melted Coconut Oil

Place all ingredients except coconut oil, in a food processor fitted with an S blade. Process until smooth and creamy, add coconut oil and mix at a low speed to combine. Spread onto cake filling and around sides.

Maple Soy Chicken


I got this recipe from a blog I really enjoy called The Moodie Foodie and we all loved it. It was easy for a weeknight, but also felt a bit fancy! As you can see, I chopped the chicken, rather than keeping the thighs whole - it was so tender and the marinade was delish!

Ingredients
500g skinless, boneless chicken thighs

Marinade
½ tsp sesame oil
¼ cup salt reduced soy sauce
1 tbsp shao xing wine or dry sherry (optional)
2 tbsp maple syrup
2 garlic cloves, crushed

Oil spray
2 cups (250g) sugar snap peas
4 large spring onions, sliced
Small knob (30-40g) fresh ginger, peeled and finely sliced into matchsticks
1 cup chicken stock
2 tsp sesame seeds, toasted
110g rice vermicelli noodles
Coriander for garnish

Method
Combine marinade ingredients together and pour over chicken thighs. Cover and pop into the fridge to marinate for 15 minutes (but if you’ve got more time, give it 2 or more hours).

Cook noodles according to the pack (probably soak in boiling water or place in boiling water for a couple of minutes). Drain, and keep warm.

Place stock and ginger into a small saucepan and bring to the boil. Reduce heat and keep warm, allowing the ginger to infuse.

Heat oven to 180°C. Roll each chicken thigh and secure with a toothpick or two. Heat large non-stick frying pan on medium, spray lightly with oil. Add chicken thighs and cook for 1 minute per side before placing in the oven for 12 minutes. While chicken is cooking, bring ginger stock back to the boil. Add sugar snap peas and cook for 1 minute before adding spring onions. Simmer for 1 minute before removing vegetables and serving with chicken and noodles with a sprinkling of sesame seeds and coriander leaves. Spoon over a little of the ginger stock.

Some additional notes:
Toast sesame seeds by place them in a small frying pan, heating on low and gently cooking them until they’re golden and fragrant. Keep and eye on them though as they burn easily.

You can replace the sugar snap peas with any vegetable you like – other great options are green beans, sliced broccolini, zucchini, bok choy.

I cook the chicken in the oven because the sauce has sugar in it which burns easily. It’s very difficult to cook the chicken properly, keeping it cooked but moist without it burning the outside when done on the stovetop.

Print